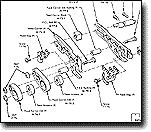
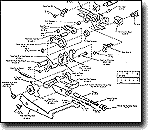
70 Class Machines Feeding Mechanism
FEED DOGS
 |
1) Feed dogs are provided with either fine cut teeth or coarse cut teeth, single row or double row, dependent upon the work. Generally, the Feed Dogs should be set as low as practical.
2) The length of feed can be changed by removing the Feed Eccentric and substituting another Feed Eccentric of different throw. Feed Eccentrics are marked to indicate approximately the number of stitches per inch produced at the edge of the fabric.
3) Feed Dogs and Needle Plates must match each other.
4) The letter “D” in the Style 70-D3B or 70-ABBD means it contains a differential or gathering feed. The differential contains two separate Feed Dogs with their separate Feed Carriers and separate Feed Eccentrics. When it is desired to prevent the edge of the fabric from being stretched or lengthened while seaming, the Front Feed Dog is made to travel a greater distance than the Rear Feed Dog. In most cases, a slight difference is sufficient and the number of each Feed Eccentric and the difference between the two is dependent upon the number of stitches required per inch and the elasticity of the fabric itself.
5) On certain fabrics it may be desirable to tilt the Feed Mechanism. To make this adjustment, loosen the Set Screw 48-5/32, slowly turn the Feed Carrier Block Pin to the desired location and tighten this Set Screw. When the Screw Slot in the Pin is level with the base of the machine, the Feed Dogs will be in their standard level position. It is never necessary to remove the Stop Screw 48-5/32. This leveling device on the Feed Mechanism permits delicate adjustment of Feed Dogs.
“Y” TYPE FEED MECHANISM
 |
6) The “Y” Type Feed Mechanism is used on Merrow Styles 70-YeB, 70-ABBY, 70-ABBY-1 and 70-ABBY-4. The following sections dealing with this Feed Mechanism apply only to these styles.
DISASSEMBLY
- Remove the Work Plate Support M-29-5 by first removing Screws (2) 52-3/16 then moving the Support to the rear. The Work Plate and Fabric Guard may be left on the Work Plate Support. Remove Needle Plate, Lower Looper Thread Tube and Feed Dogs.
- Remove Nut 2-3/16 from end of Lower Shaft and Feed Eccentric 6/82-(4-5-6-7-etc.).
- Remove Machine Base A-19 Assy-2 by removing Screws 83-3/16 (2) and one Screw 103-3/16. Feed Adjusting Lever M-357-1 must be fully depressed to expose Screw #103-3/16 and allow its removal.
- Working from the bottom of the machine unscrew Screws (2) 71-3/16 which hold Feed Link Pivot Support M-358-1 to the Machine Frame. Now, the whole Feed Assembly may be removed from the machine by sliding it to the left.
- The Feed Carrier may be separated by taking off Nut 2-3/16, F.C. Bolt 6-77-E and Bushing 6-79-D which connect it to the Feed Carrier Link (rear) M-76-4.
- The Feed Carrier Links, front M-76-3 and rear M-76-4 are removed by rotating Feed Link Pivot M-351-1 to a position where it is totally below the mounting surface of Feed Link Pivot Support M-358-1, and sliding out Feed Link Pivot Pin M-352-1.
- The Feed Link Pivot is removed by taking off Nut 4-3/16 and Feed Link Pivot Arm Spacer Bolt M-355-1, then Feed Link Pivot Arm Spacer can be slipped out of the Feed Link Pivot.
- Feed Link Pivot Arm (inner) M-353-1 will now slide out of Feed Link Pivot Support M-358-1 and Feed Link Pivot Arm (outer) M-353-2 will slide out when Set Screw 77-3/16 is removed from Feed Link Pivot Arm Actuator M-356-1.
ADJUSTMENT
- The Feed Stroke of the “Y” Mechanism is adjustable to produce stitch length variations in ratios up to 4 or 5 to 1. The normal stitch spacing is set by the Feed Eccentric (6-82-4, 5, 6, 7, 8, etc.). The multiple stitch is achieved by a stroke change actuated by depressing the Feed Adjusting Lever, M-357-1.
- The maximum and minimum positions of the Feed Adjusting Lever are controlled for Stop Screws #105-3/16 and 106-3/16, Stop Screw #105-3/16 protrudes from the front of the Feed Link Pivot Support M-358-1 is used to set the Feed Adjustment Lever for the maximum number of stitches desired at the selvages. Set Screw #106-3/16 which protrudes from the rear of Feed Link Pivot Support M-358-1 sets the number of stitches desired in the body of the seam. It is possible to make fewer stitches than the rating of the Feed Eccentric.
- Tension Spring Adjustment Screw #6-3/8 is used to adjust the spring which returns the feed adjusting lever to its normal position.


