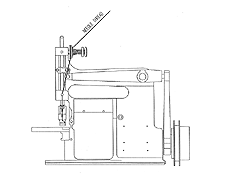


Adjustable Thread Guides and Take-up for Needle:
The Needle thread should pass from the Thread Stand downward diagonally to the Thread Eye behind the right tension.
Pass the Needle thread between the Tension Discs the down through the Outer Hole in the Needle Thread Take-Up, the through the Eye in the Lower Front of the Head of the machine, then through the Eye of the Needle from the front. Single-thread operation should follow the above threading.
Alternately, you can pass the Needle Thread through the Lower Adjustable Thread Guide after it passes through the Needle Thread Take-Up and before it goes through the Eye on the lower front of the head of the machine.
The Lower Adjustable Guide will change the amount of Needle Thread that goes into the stitch. Raising the Guide increases the thread in the stitch. Lowering the Guide decreases the thread in the stitch.
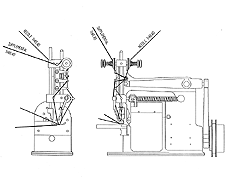
Adjustable Thread Guides and Take-up for Supplemental Thread
The Supplemental Thread passes through a Thread Eye at the left-hand side of the head of the machine, then between the Tension Discs, then down to the Upper Adjustable Thread Guide then to the inner hole of the Needle Thread Take-Up, then left and down through the Middle Adjustable Thread Guide, then down and to the rear through the Eye in the lower portion of the head of the machine, and finally through the Supplemental Thread Carrier.
The Middle Adjustable Thread Guide influences the length of the Supplemental Thread that goes into the edge of the stitch.
Raising the Guide increases the length and loosens the edge. Lowering the Guide decreases the length and tightens the edge. The Upper Adjustable Edge Guide influences the uniformity of the edge of the stitch. Raising this Guide loosens the edge finish of the stitch, while lowering tightens the edge finish of the stitch.
Do not set this Guide too low. Setting this Guide too low will cause the Supplemental Thread to be drawn when the needle is moving into its uppermost position.
A good starting position for the Three Adjustable Thread Guides would be: The Upper Adjustable Guide set close to the Supplemental Thread Tension Discs. The Middle Adjustable Guide set just slightly below horizontal. The Lower Adjustable Guide should be set at a downward angle with the thread being down near the frame.
This is a position from which you can make any necessary adjustments to the stitch following the above recommendations. Note: The moving Cast Off Horn will also affect the Stitch Tension and should be adjusted as below to work with these adjustable guides.
Threading Diagrams:
Two Thread Diagram
|