


M and MG Class Machine Needles
NEEDLE
1) Set the Needle into the Needle Carrier Assembly so that the end of the shank of the Needle is in contact with the Stop Pin 36-60, and tighten the Nut 4 3/16 with the socket wrench firmly. The beveled portion of this Nut 4 3/16 should be against the recess provided in the N.C. Collar.
NOTE: The Nut 4 3/16 should only be loosened to change the Needle; it does not have to be removed.
2) A Needle as large as is practical for the work being accomplished should be used, but care should be taken that the needle slot in the Needle Plate is large enough to fit the Needle.
3) Self-setting needles, marked with the size number and letter “D”, used on all styles of Class MG and Class M machines are available in the following sizes: (from smallest to largest) Nos. 000D, 00D, 0D, 1D, 2D, 3D, 4D, 5D, 6D, 7D, AND 8D. Special needles in some of the above sizes are available for special uses.
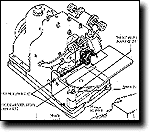 |
1) The Needle Carrier Assembly must be perfectly free to swing upon its stud, but must not have any right to left (lateral) movement. To adjust the Needle Carrier Assembly:
| A. | Remove the Upper Fabric Guard (screw 7 5/32) and the Work Plate Support (remove screws 36 5/32 from Feed Cover Support and screws 34 3/16 from Work Plate Support). |
| B. | Loosen Set Screw 8 7/32. NOTE: If loosening this screw is neglected, damage to the stud hole in the Frame will occur. |
| C. | Tighten the Needle Carrier Stud (4 9/32) until it stops then back it out 1/12 of a turn (30 degrees). Tighten Set Screw 8 7/32 and check Needle Carrier for lateral movement. Repeat this complete procedure as necessary until the Needle Carrier moves freely up and down, but has no lateral movement. |
NEEDLE PLATE
1) Most edging, seaming and serging operations require a Needle Plate with a chaining finger the width of the stitch desired and sufficiently long to permit two or three stitches to be retained on the finger as goods are fed through the machine.
2) A two-thread hemming operation usually requires a Needle Plate with a very short or “stub” finger. When such a Needle Plate is used, the changing finger is part of the presser foot finger.
3) The needle slot in the Needle Plate must always be large enough to permit the blade of the needle to pass freely. The edge of this slot should be smooth and slightly rounded. The chaining finger of the Needle Plate should be free of burrs.
4) The working surface of the Needle Plate should be corrugated for standard sewing with differential feed, and smooth for use on delicate fabrics requiring little differential.
5) The Needle Plate must match the Feeding Parts (Note Section 47).
NEEDLE CARRIER ASSEMBLY LOOPERS
6) The Upper and Lower Looper must co-operate with the Needle in order for sewing to occur. Before making any Looper adjustments, always change to a new Needle. A new Needle may solve your problem, without further adjustments.
7) The Upper Loopers are made in two general forms, one for two thread stitching and the other for three thread stitching. Adjustment of both forms are the same.
8) The Loopers are nearly self setting, but they may need slight bending to achieve proper setting. Always bend Loopers slightly farther than the position you desire. The Loopers have a tendency to spring back to their original (pre-bent) position, if you don’t bend them far enough. Loopers are designed to be bent only in the shank area. The point areas are hardened to prevent wear, and do not take a bend well.
9) To bend the Loopers, we recommend Merrow Looper Bender 30-10. Some people use the shank of a screwdriver, or pliers to do the bending. Please note: If pliers are used, they must be smooth surfaced to prevent damage to the surface of the Loopers. A good light is recommended for visibility when setting the Loopers. A piece of white paper placed behind the Loopers also makes them more visible.
<< Back to Top